How to Change the Fulfillment Location in Shopify
Last modified: May 31, 2026
Changing the fulfillment location in Shopify takes a minute once you know where the setting lives. The short version: open the order, click the location next to the unfulfilled line items, pick the new location, save. The longer answer covers when Shopify will and won’t let you change the location, what happens to inventory and shipping rates when you do, how to change the location for multiple orders at once, and how to set fulfillment-priority rules so Shopify routes future orders to the right warehouse automatically.
This guide walks through the per-order change step by step, plus the bulk-change workflow, the auto-routing rules under Settings > Shipping and delivery > Order routing, and the common errors stores hit (greyed-out location button, missing locations, partial fulfillment) and how to fix them.
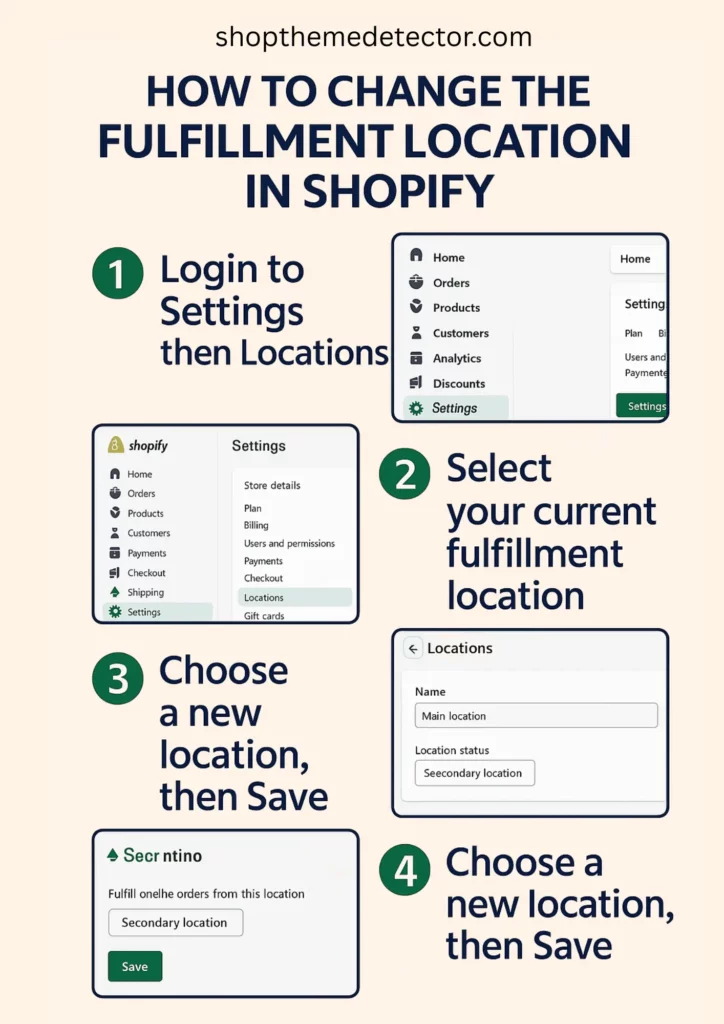
- Open Shopify admin, go to Orders, click the order you want to reassign.
- In the unfulfilled section, click the location name next to “Items”.
- Choose the new fulfillment location from the dropdown.
- Click Save. The order is now assigned to the new location.
If you don’t see your warehouse or store in the dropdown, the location hasn’t been added yet (see Step 4: Change Location below for the fix).
Step 1 - Log In
Log into your Shopify admin with an account that has the “Fulfill orders” permission. Staff accounts without that permission won’t see the location button.
Step 2 - Orders
From the main admin menu, select Orders. This loads the full order list. Find the order you want to reassign by order number, customer name, or filter by Unfulfilled status to surface the orders that are still in the pre-fulfillment stage. Click the order to open it.
Step 3 - Location
Inside the order, the unfulfilled section shows the line items with the current location next to them (something like “Items at: Main warehouse”). Click that location name. A panel opens with the alternative locations Shopify thinks can fulfill the order.
Step 4 - Change Location
Select the location you want to ship from. Only locations that hold enough stock to fulfill the unfulfilled line items appear in the list by default. If the location you want is missing, two reasons are common:
- The location is not set up yet. Go to Settings > Locations and either add a new location or check that the location is set to fulfill online orders. Until that toggle is on, the location does not appear here.
- The location doesn’t hold the required stock. Either transfer stock to that location first (Inventory > Transfers) or override the inventory check by clicking “Show all locations” if your plan allows it.
If the location button is greyed out entirely, the order has either already been partially fulfilled or moved to a third-party fulfillment service that owns the fulfillment lifecycle. In those cases you need to cancel the existing fulfillment first, then reassign.
Step 5 - Save
Click Save. The order updates with the new fulfillment location. The customer doesn’t see a notification by default (the change is internal); if you want to tell them shipping is coming from a different warehouse, send a custom email or note.
Bulk-Change Location for Multiple Orders
If you’re moving 10, 50, or 200 orders to a new warehouse (typical when opening a new fulfillment center or covering for an outage at the primary location):
- Go to Orders and filter by Unfulfilled.
- Tick the checkboxes next to each order you want to reassign.
- Click More actions in the top toolbar.
- Select Change locations from the dropdown.
- Pick the new location and click Save.
Shopify validates inventory at the new location for each order. Orders that would create negative inventory are flagged so you can adjust stock first.
Set Up Auto-Routing for Future Orders
Manually reassigning every order is fine for occasional changes but becomes painful at volume. Set up order routing rules so new orders automatically land at the right location:
- Go to Settings > Shipping and delivery.
- Scroll to Order routing and click Manage.
- Set the priority order of your locations. Shopify routes new orders to the first eligible location in your list.
- Choose routing logic: lowest cost, closest to customer, or by priority order.
For multi-warehouse stores, “closest to customer” usually wins on both cost (lower zone shipping) and customer experience (faster delivery).
Common Errors and Fixes
- “This location can’t fulfill this order” greyed-out button: the location is missing the line item’s inventory. Transfer stock or pick a different location.
- “Fulfillment service owns this order” error: the order is locked to a 3PL or app like ShipBob or ShipStation. Either cancel the fulfillment service’s claim or change it in the third-party system.
- “Order already fulfilled” error: the order has shipped (or marked as shipped). You can’t change the location on a fulfilled order; the package is already in transit.
- Locations not appearing in the dropdown: check Settings > Locations and confirm the location has “Fulfill online orders from this location” enabled.
- Staff member can’t see the location button: they’re missing the “Fulfill orders” permission. Add it in Settings > Users and permissions.
What Happens to Shipping Rates When You Change Location
Shipping rates in Shopify are calculated by zone from the fulfilling location to the customer’s address. Changing fulfillment location after the customer paid doesn’t refund or charge them more even if the new location is in a different zone, the rate they paid is locked in. On your side, the carrier label cost might be higher or lower than what the customer paid; that delta is yours to eat or pocket.
For more on the broader fulfillment setup, including stock-level management at each location and configuring shipping zones, see our guide to Shopify payments, shipping, and orders set up.
| # | Name | Image | |
|---|---|---|---|
| 1 |

|
ShipMonk | Order Fulfillment
|
|
| 2 |

|
ShipReadyGo Order Fulfillment
|
|
| 3 |

|
Shipping Automation by Shipway
|
|
| 4 |

|
Zonify ‑ Amazon Dropshipping
|
|
| 5 |

|
EZ Fulfill ‑ Auto Fulfillment
|
|
| 6 |

|
Ordersify Pick, Pack & Fulfill
|
|
| 7 |

|
fulfillempire
|
|
| 8 |

|
Easy Fulfillment
|
|
| 9 |

|
HyperSKU
|
|
|
Show More
|
|||
-
Can I change the fulfillment location for an order that’s already being processed?
Once an order is in the processing stage, changing the fulfillment location in Shopify might not be possible. It’s best to do this before the order enters the fulfillment process to avoid complications.
-
Does changing the fulfillment location affect shipping rates in Shopify?
Changing the fulfillment location can affect shipping rates in Shopify, as rates are often calculated based on the distance between the fulfillment center and the customer’s address.
-
Can I change the fulfillment location for multiple orders at once in Shopify?
Yes, you can change the fulfillment location for multiple orders simultaneously in Shopify. This is done by selecting multiple orders in the ‘Orders’ section and applying the location change in bulk.
-
Why is the change-location button greyed out on my Shopify order?
Two reasons account for almost all cases. First, the location you want to switch to doesn’t hold enough inventory for the line items; either transfer stock into that location first or pick a different one. Second, the order is owned by a third-party fulfillment service (ShipBob, ShipStation, an FBA-style app); you have to cancel the third-party fulfillment claim first or change the location inside that service’s dashboard, not in Shopify.
-
Can Shopify automatically route new orders to the closest fulfillment location?
Yes. Go to Settings > Shipping and delivery > Order routing. Set routing logic to ‘Closest to customer’ and Shopify routes each new order to whichever location holds the stock and is geographically closest to the shipping address. For most multi-warehouse stores this lowers shipping costs and speeds delivery without requiring manual reassignment.
Conclusion: Change Once, Then Set Auto-Routing
Changing the fulfillment location on a single order is fast once you know the menu path. The bigger win is setting up Order routing under Settings > Shipping and delivery so future orders land at the right location automatically, weighted by lowest cost, closest-to-customer, or your manual priority order.
For multi-location stores, pair that with a stock-transfer rhythm (Inventory > Transfers) so each warehouse holds enough of your top SKUs to satisfy the routing rules. And for broader order management questions, see our guide to Shopify product set up.


