How To Enable Pre-Orders On Shopify
Last modified: February 16, 2026

Sometimes you might want to allow customers to buy products when they’re not in stock or before they’ve been officially released. This is known as pre-orders. You can do this by changing the Shopify payment settings and creating a new, and different, product template.
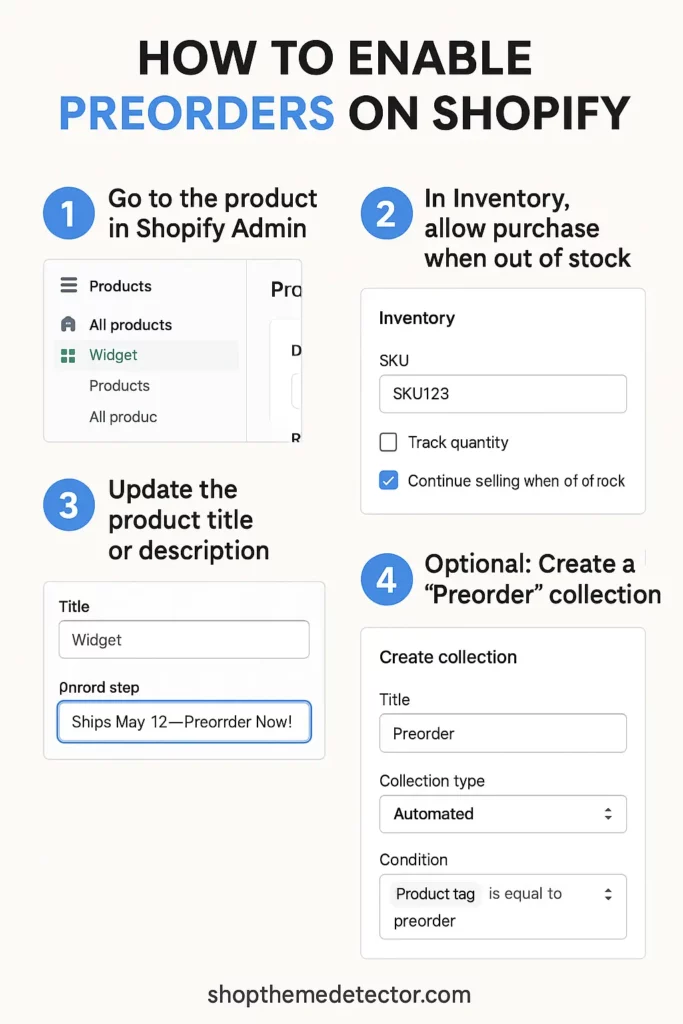
Step 1: Set Inventory to “Continue Selling When Out of Stock”
- Go to your Shopify Admin
- Click Products
- Select the product you want to make available for pre-order
- Scroll to Inventory
- Check “Continue selling when out of stock”
This tells Shopify to let customers buy it, even if there’s none in stock. It’s now a pre-order.
Step 2: Add “Pre-Order” to the Product Title or Description
Label it clearly so customers know what’s up.
- Example title:
Knit Sweater - Pre-Order Ships Oct 2025 - Or add this to the description: This is a pre-order item. Estimated shipping date: October 5, 2025.
Step 3: Optional - Use a Pre-Order App (for more control)
If you want:
- Deposit payments
- Pre-order buttons
- Automatic back-in-stock alerts
… then install a Shopify app for it.
You can find these in the Shopify App Store. Most have free plans.
Step 4: Update Shipping Times
Avoid customer rage. Go to: Settings → Policies → Shipping Policy Add a note like: Pre-order items ship 3-4 weeks after purchase.
Step 5: Test It
Pretend to be a customer. Add to cart, buy, make sure it’s labeled clearly and the cart doesn’t scream “out of stock.”
Or you could also use a preorder app.
| # | Name | Image | |
|---|---|---|---|
| 1 |

|
Globo Pre-Order
|
|
| 2 |

|
Pre-order Now - Pre-order
|
|
| 3 |

|
Timesact
|
|
| 4 |

|
Pre-Order Manager 2.0 PreOrder
|
|
| 5 |

|
Advanced Pre-Order
|
|
| 6 |

|
In Stock Alerts
|
|
| 7 |

|
Coming Soon Products Preorders
|
|
| 8 |

|
Pre-order PRO | Pre-orderly
|
|
| 9 |

|
Handy • Preorder and Bar
|
|
| 10 |

|
Vitals
|
|
| 11 |

|
Back In Stock: Customer Alerts
|
|
|
Show More
|
|||
-
How do I manage inventory for pre-order products?
For pre-order products, you can set the inventory to “Continue selling when out of stock” in the product’s inventory settings. This allows customers to order even if the inventory is zero.
-
Can I set a specific release date for pre-order products on Shopify?
Yes, you can set a specific release date for pre-order products. This can be done by adding a custom field to your product page or using a Shopify app designed for pre-orders that allows you to display the release date.
-
Are there any limitations when setting up pre-orders on Shopify?
Shopify lacks native pre-order support, but third-party apps can enable it. Proper payment authorization setup is crucial to prevent premature charges and be aware that certain payment gateways may not support pre-orders, such as Google Pay or Apple Pay.
Understanding Pre-Orders
Why Pre-Orders Matter
Pre-orders are not just about selling a product before its release. They offer a way to gauge customer interest, manage inventory, and even raise capital for production. By allowing customers to reserve products, businesses can generate excitement and anticipation.
Moreover, for tangible products, the process can be risky and expensive. Pre-orders provide a safety net, ensuring there’s demand before diving into full-scale production.
Types of Pre-Orders
There are various pre-order models to consider:
- Pay Now: Customers pay immediately, and you must meet shipping expectations.
- Pay Later: No funds are exchanged until the product is ready, ideal for gathering interest data.
- Crowdfunding: Funds are collected upfront, suitable for startups needing initial capital.
Setting Up Pre-Orders on Shopify
While Shopify doesn’t natively support pre-orders, several apps facilitate this feature. Some top recommendations include PreOrder Now.
Once an app is chosen, it’s crucial to set up payment authorizations correctly. This ensures you don’t charge customers until the product is ready to ship.
Additionally, creating a dedicated pre-order page template can enhance the customer experience, making the process transparent and straightforward. You can also consider adding a link to a webpage that provides more information about the pre-order process or the upcoming product.
Optimizing Pre-Order Strategy
Terms and Conditions
Clear terms and conditions are vital. They should cover estimated delivery dates, refund policies, billing information, and any other relevant details. This transparency builds trust and sets clear expectations for the customer.
Marketing Your Pre-Orders
Promotion is key. Use urgency and scarcity tactics to drive sales. Consider offering incentives like discounts or exclusive gifts for early adopters.
Utilize email marketing, social media, and even paid ads to spread the word. Additionally, you can add products to Facebook to increase visibility and reach a wider audience.
Feedback and Iteration
Once your pre-order campaign concludes, gather feedback. Understand what worked and what didn’t. This insight is invaluable for future product launches and pre-order campaigns.
Reminders When Enabling Pre-Orders On Shopify
Importance of Communication
When enabling pre-orders on Shopify, it’s crucial to maintain open communication with customers. They’ve shown trust by paying for a product not yet available, so keep them informed about production updates, potential delays, and expected delivery dates.
Inventory Management
Ensure that the inventory settings on Shopify are adjusted to allow sales of products even if they’re out of stock. This setting is vital for pre-orders to function correctly. However, be cautious not to oversell, as this can lead to fulfillment challenges and unhappy customers. Consider limiting the quantity available for pre-order to avoid overselling.
Utilize Reminder Emails
Consider sending reminder emails to customers who’ve placed pre-orders. These emails can serve multiple purposes: updating on product status, offering complementary product suggestions, or simply keeping your brand top-of-mind. Automated email tools can help streamline this process.
Conclusion: How To Enable Pre-Orders On Shopify
By allowing customers to pre-order products, you can generate lots of revenue for your business and not miss out on revenue. Before enabling pre-orders, it’s essential to set up the store correctly, including configuring inventory settings, payment authorizations, and creating a dedicated pre-order page template.